USBTherm
Simple micro controller based USB thermometer with Linux kernel driver module and simple Java desktop app
About
This project is about writing a basic but complete Linux kernel USB driver module together with a simple, programmable USB device to test the driver and have something to play with. It includes a schematic and a PCB layout, and a simple Java desktop application.
The intention for me was mainly to get an understanding of how a Linux driver module looks like and how it works, how a kernel module is automatically loaded when a hardware device is connected to a PC, and how a device file is created, allowing an application to communicate with the device.
It is great fun! The Linux kernel is just awesome, it all works so well.
I however had to spend quite some time to read documentation and put together this basic USB driver
looking at other drivers and examples out there, so I thought it is maybe interesting for
someone if I share it here.
If you think a USB thermometer is just too simple, have a look at WeatherPi.
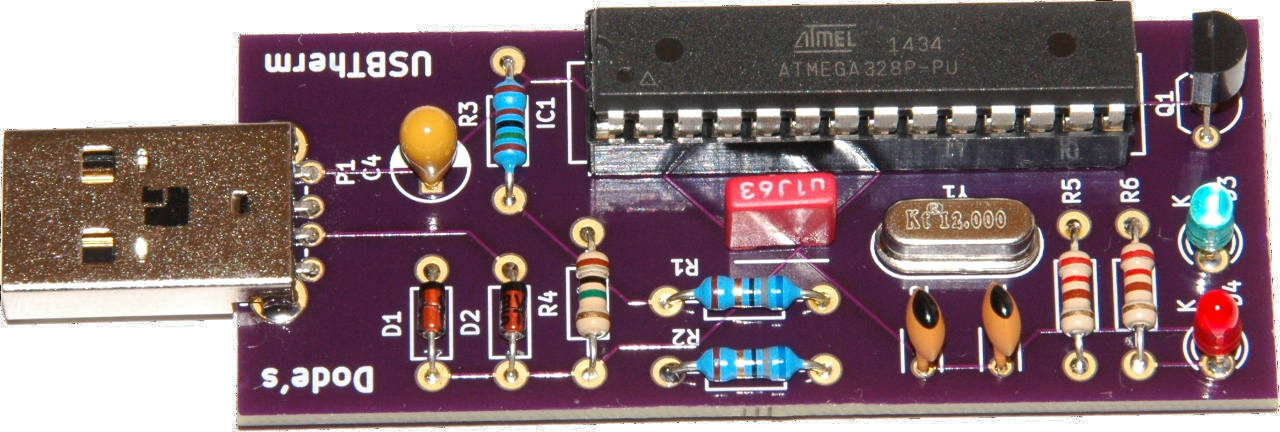
USB Device
The USB 1.1 thermometer is based on an 8 bit AVR microcontroller like the well-known ATmega328P
and the V-USB firmware-only USB implementation.
Of course, the 328P is overkill for such a simple application, a smaller one will do as well as long
as V-USB runs on it.
The temperature is measured with a
TMP36,
converted with 16x oversampling and averaged with an exponential weighted moving average,
contributing to accurate and stable measurements.
With the TMP36, the measuring range is -40 to +150°C with ±1 to ±2°C accuracy.
An alternative, i.e. for a USB 2.0 device, would be to use one of the "U" ATmega's like the ATmega32-U2 providing USB 2.0 hardware support and LUFA, a Lightweight USB Framework for AVRs.
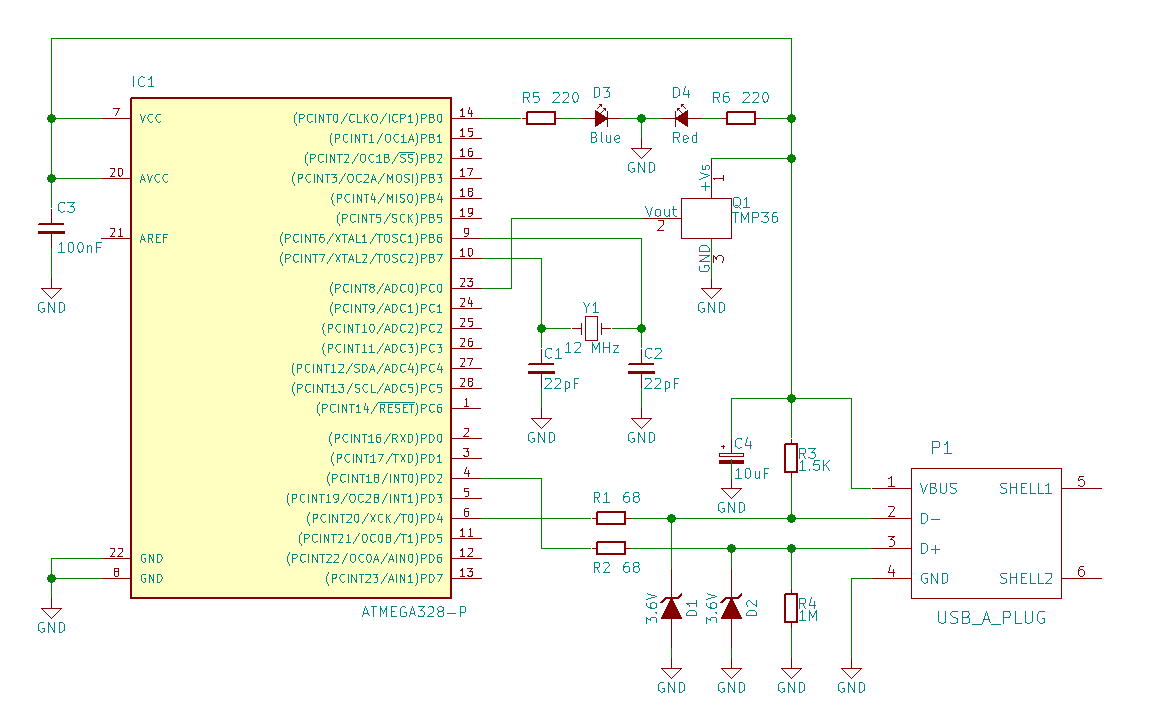
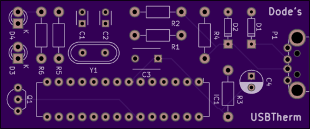
Schematic and PCB
The schematic is based on Metaboard and, as well as the PCB, created with KiCad, which is also just awesome. I just needed to figure out to use the "g" key to drag parts and wires, from then I found it very intuitive to use.
For routing I used FreeRouting, which is also awesome and easy to use together with KiCad. Here is a Maven based fork of FreeRouting.
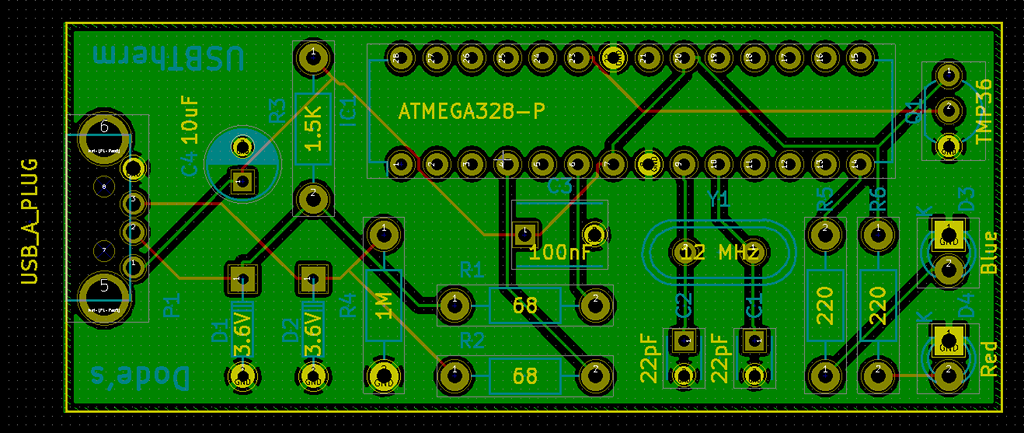
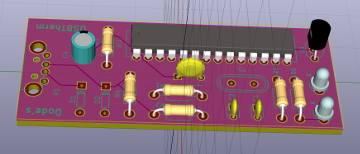
KiCad's 3D viewer gives a very good idea on how the board is going to look like when designing the PCB:
PCB Manufacturing
I've ordered my first 3 PCBs ever from OSH Park, which is super easy, all that needs to be done is to upload the KiCad PCB project and check if everything looks fine. I can't really compare the pricing with other PCB manufacturers, I had a look at a few, but I just didn't feel like filling out a huge form to get a quote. At OSH Park it is as simple as it can be: $5 per sqare inch for 3 two-layer boards with free shipping. The PCBs were produced and delivered to Germany in 14 days and they look great!
Beginners Mistakes
Since I was totally unexperienced designing a PCB layout, I made at least some mistakes:
- Maybe I didn't create the footprint for the USB A plug correctly, but it fits well
- I'm still not sure if I should have included an ISP header in the layout or not. My idea was to use a socket for the controller and program it externally
Firmware
The firmware can be found here.
Besides initializing V-USB and then calling usbPoll() in the main loop, at least the function
usbFunctionSetup() must be implemented.
I've implemented just one request CUSTOM_REQ_TEMP, which is a custom "vendor" type status request
used by the kernel driver
to request the current temperature value, and is returning USB_NO_MSG,
so the function usbFunctionRead() is called to actually read the value.
For the function to be called it is also necessary to #define USB_CFG_IMPLEMENT_FN_READ 1
in usbdrv/usbconfig.h.
For an unofficial vendor id, I checked against The USB ID Repository to find one that is not in use and thus no other driver should feel responsible for.
The project
contains a Makefile including the targets make to build it and make flash
to flash it on the controller.
It is probably necessary to make some settings in there for the programmer being used.
Also, lfuse of the 328P must be set to 0xf7 or 0xff
so the crystal is used is clock source.
Linux Driver
The Linux driver can be found here.
I enjoyed a lot to get into kernel modules with the very well written
Linux Kernel Module Programming Guide,
but unfortunately is a bit outdated and it doesn't cover USB driver modules.
For example, there is module_usb_driver(), a helper macro for registering a USB driver,
replacing module_init() and module_exit().
The following additional resources I found very helpful:
- Module
drivers/usb/misc/usbled.c - ML-driver
Registering the Module
The module is registered for one or more USB devices using the macroMODULE_DEVICE_TABLE:
static const struct usb_device_id usbtherm_usb_tbl[] = {
	/* Custom USBTherm device */
	{USB_DEVICE(0xd0de, 0x0001), .driver_info = DODES_USB_THERMOMETER},
	{} /* terminator */
};

MODULE_DEVICE_TABLE(usb, usbtherm_usb_tbl);
After building and installing the module and running depmod -a, the file
/lib/modules/$(uname -r)/modules.alias contains an alias for the module:
alias usb:vD0DEp0001d*dc*dsc*dp*ic*isc*ip*in* usbtherm
Now, when the device is connected, the module is loaded automatically.
Creating USB Class Device and Device Node
The file operationsdevice_open(), device_release(),
device_read() and device_write() are passed to
the struct usb_class_driver which can be used by drivers that
want to use the USB major number instead of allocating its own major number:
static struct usb_class_driver usbtherm_class = {
	.name = DRV_NAME "%d",
	.devnode = usbtherm_devnode,
	.fops = &fops,
	.minor_base = 0
};
Passed to usb_register_dev(), a usb class device is created in
/sys/class/usbmisc/:
lrwxrwxrwx 1 root root 0 Jun 30 16:12 usbtherm2 -> ../../devices/pci0000:00/0000:00:1d.0/usb2/2-1/2-1.2/2-1.2.4/2-1.2.4:1.0/usbmisc/usbtherm2and a char major 180 device node is created with, on my system, minor number 2:
crw-rw-rw- 1 root root 180, 2 Jun 30 16:11 /dev/usbtherm2
Probe and Disconnect
Theprobe and disconnect functions are put in the struct usb_driver:
static struct usb_driver usbtherm_driver = {
    .name = 		DRV_NAME,
    .id_table =		usbtherm_usb_tbl,
    .probe = 		usbtherm_probe,
    .disconnect = 	usbtherm_disconnect,
};
That's basically the whole wiring, all that's left is to implement the functions
probe, device_open() and so on.
Reading from the Device
Indevice_open(), I'm sending the custom "vendor" type status request
CUSTOM_REQ_TEMP to the thermometer to get the current temperature value:
usb_control_msg(dev->usbdev,
	usb_rcvctrlpipe(dev->usbdev, USB_DIR_OUT),
	CUSTOM_REQ_TEMP, USB_DIR_IN | USB_TYPE_VENDOR | USB_RECIP_DEVICE,
	0, 0, urb_transfer_buffer, sizeof(urb_transfer_buffer), 1000);
The value is later written to the buffer message and can then be read
by an application from the device node in device_read().
Building and Installing the Driver
The driver project includes a simple Makefile. Provided that the kernel headers are installed, the driver module can be built with:makeand installed (as root) with:
make installThen, when connecting the device,
dmesg shows that the driver is loaded:
[27719.128242] usb 1-1.1: new low-speed USB device number 8 using ehci-pci
[27719.227485] usb 1-1.1: New USB device found, idVendor=d0de, idProduct=0001
[27719.227494] usb 1-1.1: New USB device strings: Mfr=1, Product=2, SerialNumber=0
[27719.227499] usb 1-1.1: Product: USBTherm
[27719.227504] usb 1-1.1: Manufacturer: Dode
[27719.797687] usbtherm: USB device was connected
[27719.797738] usbcore: registered new interface driver usbtherm
The device node is created and the current temperature value (°C x10) can be read from it:
dode@linus:~$ cat /dev/usbtherm2
265
So, 26.5 °C - one of the few sunny days so far...
Libusb Interface
The libusb interface can be found here.
A portable alternative to the Linux kernel driver module. libusb is also awesome and well documented, including the different examples (both linked at the aforementioned page).
The interface is a small executable that first finds the USBTherm device:device = libusb_open_device_with_vid_pid(NULL, ID_VENDOR, ID_PRODUCT);And then it makes the custom control request to read the temperature value:
status = libusb_control_transfer(device,
	LIBUSB_ENDPOINT_IN | LIBUSB_REQUEST_TYPE_VENDOR | LIBUSB_RECIPIENT_DEVICE,
	CUSTOM_REQ_TEMP, 0, 0, data, sizeof(data), 1000);
Looks very similar to the request in the Linux driver :-)
That's it, just libusb_close(device) and libusb_exit(NULL) and done!
Linux
A 64 bit binary can be found here
and can be copied to for example /usr/local/bin.
/etc/udev/rules.d/99-usbtherm.rules:
SUBSYSTEM=="usb", ATTRS{idVendor}=="d0de", ATTRS{idProduct}=="0001", MODE="0666"
And then reload udev:
sudo udevadm control --reloadRunning
usbtherm should print the current temperature value (°C x10):
dode@linus:~$ usbtherm
265
Windows
A 64 bit binary can be found here
and can be copied to for example C:\Windows.
For the libusb interface to work, it is necessary to install a driver for the device. The recommended way is to install WinUSB with Zadig.
Runningusbtherm.exe should print the current temperature value (°C x10):
C:\>usbtherm
265
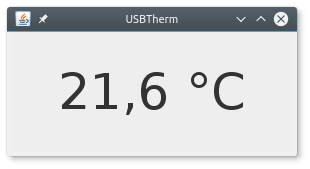
Desktop App
The desktop app can be found here.
It really is very simple, basically just a frame with a label displaying the temperature value read once a second. It supports accessing the USBTherm device both via the device file provided by the Linux kernel driver module as well as the libusb interface.
It requires Java 8 and Maven to build:mvn clean packageThis builds an executable JAR
target/usbtherm-ui.jar which takes two optional arguments:
- access-method:
DEVICEFILEorLIBUSB(default) - device-file: i.e.
/dev/usbtherm0(default)
java -jar usbtherm-ui.jar [access-method] [device-file]
The executable JAR can be found here.
The project contains a little shell script for Linux and a batch file for Windows that can be used to start the app.
Source Code
AVR firmware, KiCad PCB, Linux driver, Java UI
Comments? dode@luniks.net